Admin powershell
Affichage des articles dont le libellé est windows. Afficher tous les articles
Affichage des articles dont le libellé est windows. Afficher tous les articles
jeudi 2 juillet 2026
jeudi 14 novembre 2024
Create Windows 11/10 Bootable USB Installation Media in Command Prompt from iso file
recopié sans les screenshots de :
https://www.elevenforum.com/t/create-windows-11-bootable-usb-installation-media.750/
Certaines étapes ne fonctionnent pas si le disque est GPT. Notamment la partition EFI doit être montée en sélectionnant dans diskpart la partition et en lui assignant une lettre. Mais cette partition reste inaccessible dans l'explorer. Il faut copier les fichiers en ligne de commande.
1 If you have not already, you will need to download a Windows 11 ISO file.
2 Connect the 8 GB or larger USB flash drive.
3 Open an elevated Windows Terminal, and select Windows PowerShell or Command Prompt.
4 Type diskpart into the elevated terminal, and press Enter.
5 Type list disk into the elevated terminal, press Enter, and make note of the Disk
6 Type select disk # into the elevated terminal, and press Enter.
Je vérifie que le disk est bien sélectionné histoire de ne pas faire un clean sur le disque principal...
list disk
N° disque Statut Taille Libre Dyn GPT
--------- ------------- ------- ------- --- ---
Disque 0 En ligne 167 G octets 100 M octets *
* Disque 1 En ligne 57 G octets 0 octets
7 Type clean into the elevated terminal, and press Enter.
Je reçois après le clean :
Diskpart a rencontré une erreur : Accès refusé.
Pour plus d’informations, voir le journal d’événements système.
list partition
Il n’y a pas de partitions à afficher sur ce disque.
detail disk
Lexar USB Flash Drive USB Device
ID du disque : 1A244A30
Type : USB
État : En ligne
Chemin : 0
Cible : 0
ID LUN : 0
Chemin d’accès de l’emplacement : UNAVAILABLE
État en lecture seule actuel : Non
Lecture seule : Non
Disque de démarrage : Non
Disque de fichiers d’échange : Non
Disque de fichiers de mise en veille prolongée : Non
Disque de fichiers de vidage sur incident : Non
Disque en cluster : Non
N° volume Ltr Nom Fs Type Taille Statut Info
---------- --- ----------- ----- ---------- ------- --------- --------
Volume 3 D Amovible 0 o Inutilis.
Peut-être faudrait-il mettre le disk offline pour ne pas avoir l'erreur mais pas possible sur une clef usb
offline disk
Erreur du service de disque virtuel :
L’opération n’est pas prise en charge sur un média amovible.
8 Type convert mbr into the elevated terminal, and press Enter.
9 Type create partition primary size=1024 into the elevated terminal, and press Enter.
10 Type create partition primary into the elevated terminal, and press Enter.
comme après la création la partition 2 est déjà sélectionnée je la formate directement donc passer au point 15 :)
11 Type select partition 1 into the elevated terminal, and press Enter.
12 Type format fs=fat32 quick into the elevated terminal, and press Enter.
13 Type assign letter=X into the elevated terminal, and press Enter.
14 Type active into the elevated terminal and press Enter.
15 Type select partition 2 into the elevated terminal, and press Enter.
16 Type format fs=ntfs quick into the elevated terminal, and press Enter.
17 Type assign letter=Y into the elevated terminal, and press Enter.
18 You can now close the elevated Windows terminal.
19 Open File Explorer (Win+E) to This PC. You will see the USB has two partitions. Partition "X" with FAT32 file system, and partition "Y" with NTFS file system. (see screenshot below)
20 Mount the ISO file from step 1.
21 Perform the following steps to copy the mounted ISO contents to the USB X: (FAT32) partition:
- Click/tap on the mounted ISO in the navigation pane of File Explorer to open it.
- Select everything except the sources folder in the mounted ISO.
- Right click or press and hold on the selected files.
- Click/tap on Show more options (Shift+F10).
22 Click/tap on Send to, and click/tap on the USB Drive (X: ).
23 Perform the following steps to copy the "sources" folder from the mounted ISO to the USB Y: (NTFS) partition:
- Click/tap on the mounted ISO in the navigation pane of File Explorer to open it.
- Select only the sources folder in the mounted ISO.
- Right click or press and hold on the selected sources folder.
- Click/tap on Show more options (Shift+F10).
24 Click/tap on Send to, and click/tap on the USB Drive (Y: ).
It may take a while to finish copying the sources folder to the USB Y: (NTFS) partition.
25 Open the USB X: (FAT32) partition, and create a new folder (Ctrl+Shift+N) named sources.
26 Open the Y:\sources folder from the USB Y: (NTFS) partition, and Cut (Win+X) the boot.wim file.
28 The Windows 11 bootable USB installation media is now ready.
29 You can unmount the ISO file.
30 You can now close all File Explorer windows.
lundi 12 février 2024
Suppress Tendance Search in Windows 10
Pour arrêter que les recherches tendances n'apparaissent dans la barre de recherche de Windows 10 :
**Registry Editor:**
- Press `Win + R`, type `regedit`, and press Enter.
- Navigate to `HKEY_CURRENT_USER\Software\Microsoft\Windows\CurrentVersion\Search`.
- Create a new DWORD (32-bit) value named `BingSearchEnabled` and set its value to `0`.
- If the DWORD value "CortanaConsent" exists, set it to `0` as well.
- Restart your computer.
jeudi 11 février 2021
Windows gérer activer désactiver réparer le boot manager
Provenant de https://www.reneelab.fr/windows-boot-manager.html
Merci.
Méthode 1: Activer et désactiver le Windows Boot Manager par l’invite de commandes
Il
est nécessaire de fonctionner par un compte administrateur. Si vous
n’en avez pas, veuillez créer un nouveau compte pour exécuter les
commandes.
① Entrez « Invite de commandes » dans la barre de recherche, puis faites un clic droit sur Invite de commandes – Exécuter en tant qu’un administrateur .
② Dans la boîte d’invite de commandes ouverte, entrez les invites de commandes【bcdedit /set {bootmgr} displaybootmenu yes】 et 【bcdedit /set {bootmgr} timeout 30】.
Le chiffre après le Timeout représente le nombre de secondes qui reste à l’interface de le Gestionnaire de démarrage Windows, ce qui peut être défini selon votre besoin. Et puis, appuyez sur Entrée un par un pour ouvrir chaque commande.
③ Si vous voulez désactiver le Gestionnaire de démarrage Windows, entrez la commande 【bcdedit /set {bootmgr} timeout 0】 et changez le nombre de secondes après timeout en 0.
Vous
pouvez utiliser aussi la commande 【bcdedit /set {bootmgr}
displaybootmenu no】 pour fermer le Gestionnaire démarrage Windows. Mais la méthode 2 de activer/désactiver est incapable d’utiliser si vous le fermer par ce moyen.
Méthode 2: Activer et désactiver le Windows Boot Manager par les propriétés du système
① Appuyez sur l’icône Windows et le bouton R pour ouvrir la boîte d’Exécuter.
② Entrez la commande 【sysdm.cpl】 dans la boîte d’exécuter , puis touchez Entrée.
③ Dans la boîte de Propriétés du système affichée, sélectionnez 【Options Avancées】.
Vous pouvez également faire un clic droit sur 【Ordinateur】, cliquer sur 【Propriétés】, puis sélectionner 【Paramètres système avancés】. Vous pouvez alors accéder directement à l’option 【Avancé】 des propriétés du système.
④ Cliquez sur le bouton 【Paramètres…】 sous l’onglet【Démarrage et récupération】. Dans la boîte affichée, cochez l’option 【Afficher les systèmes d’exploitation pendant: xx secondes】 sous 【Démarrage du système】. Définissez une valeur, (par exemple 30 secondes), puis touchez « OK » pour confirmer.
⑤ Si vous voulez désactiver le Gestionnaire de démarrage Windows, il vous suffit de décocher l’option 【Afficher les systèmes d’exploitation pendant :xx secondes】 , ou changez la valeur en 【0】.
Ajouter ou supprimer un système d’exploitation dans le Windows Boot Manager
Si votre ordinateur dispose de plusieurs systèmes, il ajoutera automatiquement après l’installation. S’il n’y a pas d’ajout automatique, veuillez ajouter le système d’exploitation selon la méthode suivante.
Cette méthode doit être exécutée en tant qu’administrateur. Si vous n’en a pas, veuillez créer un nouveau compte.
Comment ajouter des systèmes d’exploitation ?
① Entrez 【Invite de commandes】 dans le barre de recherche, puis faites un clic droit sur Invite de commandes et exécutez en tant qu’un administrateur. Entrez les invites de commandes suivantes une par une:
【bcdedit /create {ntldr} /d « Windows XP »】 (Remarque: Entrez le nom du système que vous souhaitez ajouter entre les guillemets. Par exemple, si vous souhaitez ajouter le système d’exploitation Windows XP, entrez Windows XP).
【bcdedit /set {ntldr} device partition=C:】 (Remarque: Le C correspond à la lettre de lecteur du système XP , pouvant être modifiée en fonction de votre situation actuelle.)
【bcdedit /set {ntldr} path \ntldr】
【bcdedit /set {ntldr} description « Windows XP »】 (Remarque: Entrez le nom du système que vous souhaitez ajouter entre les guillemets. Par exemple, si vous souhaitez ajouter le système d’exploitation Windows XP, entrez Windows XP)
② Entrez
chaque commande et touchez Entrée pour la exécuter. Une fois
l’opération réussie, vous pouvez ajouter un système d’exploitation au
Gestionnaire de démarrage Windows.
En outre, l’invite de commande 【bcdedit /displayorder {ntldr} /addfirst】
sert à afficher le système ajouté en premier dans le menu de démarrage.
Vous pouvez entrer cette commande si vous en avez besoin.
Comment supprimer des systèmes d’exploitation ?
Si vous ne voulez pas que les systèmes anciens et superflus sont affichés dans le menu de démarrage donc vous voulez les supprimer, veuillez suivre les étapes ci-dessous.
Cette méthode doit être exécutée en tant qu’administrateur. Si vous n’avez pas de compte administrateur, créez-en un nouveau.
① Entrez 【Invite de commandes】 dans la barre de recherche, puis faites un clic droit sur Invite de commandes
et exécutez en tant qu’un administrateur. Entrez l’invite de commande
« bcdedit » pour voir quel identificateur de système vous allez
supprimer.
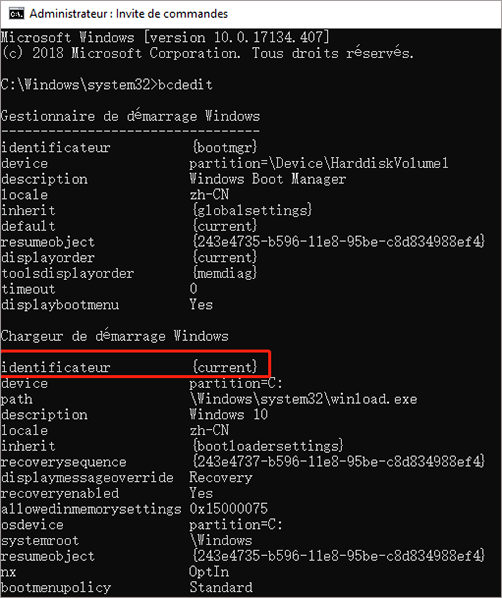
② Par
exemple si vous voudriez supprimer le système Windows XP et son
identificateur est {ntldr}, il vous suffit d’entrer la commande
« bcdedit /delete {ntldr} » pour l’exécuter.
Attention
! Il vous faut vérifier le contenu d’identificateur et éviter de
supprimer accidentellement le système utilisé entraînant un échec de
démarrage. Le système avec l’identificateur 【current】 est lequel vous
êtes en train d’utiliser.
Comment récupérer en cas de problème avec le Windows Boot Manager?
En cas de problème avec le Windows Boot Manager, le système ne
démarrera pas correctement. Il affichera généralement un écran bleu au
démarrage de Windows comme l’image ci-dessous:
Le Windows Boot Manager est principalement composé de 2 parties:
La première partie est constituée des données de configuration de démarrage (élément de démarrage), généralement conservés dans le fichier BCD. Les problèmes de ce fichier entraînent des échecs de l’écran bleu comme: 0xc000000f, 0xc0000225, 0xc0000034, etc.
La deuxième partie est le fichier du système comme: le fichier bootmgr. Les problèmes de ce fichier entraînent des échecs comme l’invite d’ereur « bootmgr is missing « .
Il y a un problème avec le projet de démarrage
①
Démarrer l’ordinateur Branchez le USB d’installer Windows et entrez dans le BIOS pour
régler l’ordre du démarrage à partir du USB d’installer Windows.
② Démarrez avec succès la clé USB dans l’interface d’installation de Windows 10, cliquez sur 【Réparer l’ordinateur】 en bas à gauche.
③ Après avoir entré dans Windows RE, sélectionnez【Dépannage】>【Options avancées】>【Invite de commandes】.
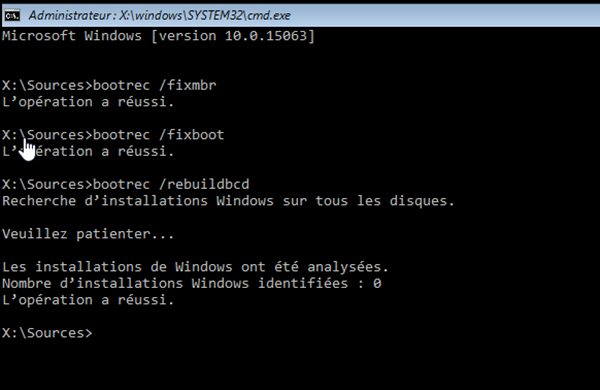
④ Entrez un par un les invites de commandes suivantes:【bootrec /fixmbr】, 【bootrec /fixboot】, 【bootrec /rebuildbcd】
dans la fenêtre d’invite, puis touchez « Entrée » à la fin de chaque
invite de commandes. Après avoir entré les commandes ci-dessus, vous
pouvez réparer le fichier BCD avec succès.
Il y a un problème avec les fichiers du système comme Bootmgr
① Selon les étapes ci-dessus, entrez à l’interface Windows RE par le USB d’installer Windows, accédez ensuite ‘a Invite de commandes.
② Entrez la commande 【sfc /scannow】, puis touchez « Entrée » pour le lancer, vous pouvez analyser votre système Windows avec succès et récupérer le fichier Bootmgr.
Le
fichier système Bootmgr est perdu ou endommagé, c’est probable que
l’enregistrement d’amorçage principal du disque dur soit défectueux ou
corrompu. Entrez la commande « bootrec /fixmbr » pour le récupérer.
Set Clock Time on Dual-Boot Systems
If you're dual-booting Ubuntu 18.04 and Windows 10, you may find that changing time in one system affects the other and the two systems can't display the same time.
This happens as Ubuntu interprets the hardware clock or real time clock (RTC) in universal time (UTC) by default while Windows 10 maintains the clock in local time.
You can fix this by keeping RTC in local time in Ubuntu by running a command in the terminal below.
timedatectl set-local-rtc 1 --adjust-system-clock
To undo this setting, enter the command below.
timedatectl set-local-rtc 0 --adjust-system-clock
Alternative:
As an alternative, you can also make Windows use UTC so that it's consistent with that used in Ubuntu.
Download this registry file WindowsTimeFixUTC and double click on it to run the file in Windows.
Then run this command sc config w32time start= disabled in a command prompt as an administrator to configure the Service Control in Windows so that it will not continue to write local time.
jeudi 7 janvier 2016
Commandes firewall Windows XP
Commandes firewall Windows XP
tasklist > tasklist.txt
tasklist /svc > tasklist.txt
Netsh firewall show state
Netsh firewall show config
Recueil de donnéesCommande Description
show allowedprogram Indique les programmes autorisés.show config Indique la configuration locale en détail.
show currentprofile Indique le profil.
show icmpsetting Indique les paramètres ICMP.
show logging Indique les paramètres de connexion.
show opmode Indique le mode d'opération.
show portopening Indique les ports avec exceptions.
show service Indique les services.
show state Indique les informations sur l'état.
show notifications Indique les paramètres des notifications.
ConfigurationCommande Description
add allowedprogram Permet d'ajouter du trafic avec exception en précisant le nom de fichier du programme.set allowedprogram Permet de modifier les paramètres d'un programme autorisé.
delete allowedprogram Permet de supprimer un programme autorisé.
set icmpsetting Permet de préciser le trafic ICMP autorisé.
set logging Permet de préciser les options de connexion du Pare-feu Windows, globalement ou pour une connexion spécifique (interface).
set opmode Permet de préciser le mode d'opération du Pare-feu Windows, globalement ou pour une connexion spécifique (interface).
add portopening Permet d'ajouter un trafic avec exception en précisant un port TCP ou UDP.
set portopening Permet de modifier les paramètres d'un port TCP ou UDP ouvert.
delete portopening Permet de supprimer un port TCP ou UDP ouvert.
set service Pour activer ou ignorer le trafic RPC et DCOM, le partage de fichiers et d'imprimantes et le trafic UPnP.
set notifications Permet de préciser si les notifications à l'utilisateur, lorsque les programmes essaient d'ouvrir les ports, sont activées.
reset Rétablit la configuration standard du pare-feu. Cette fonction est équivalente au bouton Paramètres par défaut de l'interface du Pare-feu Windows.
samedi 12 juillet 2014
WINDOWS 7 commandes administrateur diverses
Réparation du système
sfc /scannowActiver l'administrateur du système
net user administrator /active:yes
TrustedInstaller user
NT SERVICE\TrustedInstaller
samedi 5 novembre 2011
To reset a forgotten administrator password
Found this trick on http://4sysops.com/archives/forgot-the-administrator-password-the-sticky-keys-trick/
- Boot from Windows PE or Windows RE and access the command prompt.
- Find the drive letter of the partition where Windows is installed. In Vista and Windows XP, it is usually C:, in Windows 7, it is D: in most cases because the first partition contains Startup Repair. To find the drive letter, type C: (or D:, respectively) and search for the Windows folder. Note that Windows PE (RE) usually resides on X:.
- Type the following command (replace “c:” with the correct drive letter if Windows is not located on C:):
copy c:\windows\system32\sethc.exe c:\
This creates a copy of sethc.exe to restore later. - Type this command to replace sethc.exe with cmd.exe:
copy /y c:\windows\system32\cmd.exe c:\windows\system32\sethc.exe
Reboot your computer and start the Windows installation where you forgot the administrator password. - After you see the logon screen, press the SHIFT key five times.
- You should see a command prompt where you can enter the following command to reset the Windows password (see screenshot above):
net user your_user_name new_password
If you don’t know your user name, just type net user to list the available user names. - You can now log on with the new password.
vendredi 10 juin 2011
activer mode hibernation mise en veille prolongée windows vista
Pour activer la mise en veille prolongée windows vista/seven
powercfg -h on
Inscription à :
Articles (Atom)